Last summer I began reverse engineering Animal Crossing for the GameCube to explore the possibility of creating mods for the game. I also wanted to document the process to create tutorials for people interested in ROM hacking and reverse engineering. In this post I explore the developer debugging features that are still left in the game, and how I discovered a cheat combo that can be used to unlock them.
new_Debug_mode
While looking around at some leftover debug symbols, I noticed functions and variable names that contained the word “debug”, and thought it would be interesting to see what debug functionality might be left in the game. If there were any debugging or developer features I could activate, it might also help with the process of creating mods.
The first function I took a look at was new_Debug_mode.
It’s called by the entry function, which runs right after the Nintendo
trademark screen finishes. All it does is allocate a 0x1C94 byte structure and
save its pointer.
After it gets called in entry, a value of 0 is set at offset 0xD4 in the allocated structure,
right before mainproc is called.
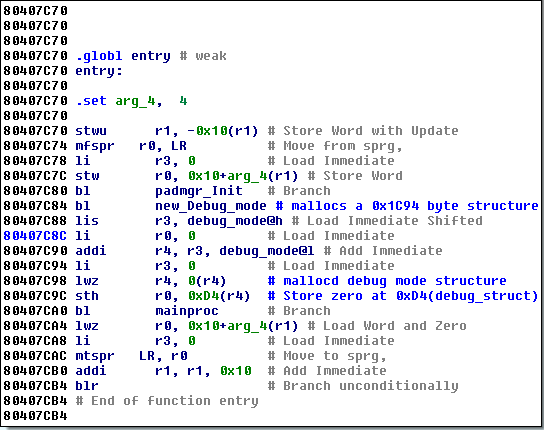
To see what happens when the value is non-zero, I patched the li r0, 0 instruction at
80407C8C to li r0, 1. The raw bytes for the instruction li r0, 0 are 38 00 00 00,
where the assigned value is at the end of the instruction, so you can just change this
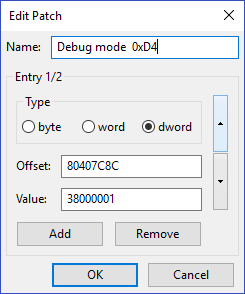
to 38 00 00 01 to get li r0, 1. For a more reliable way to assemble instructions,
you could use something like kstool:
$ kstool ppc32be "li 0, 1"
li 0, 1 = [ 38 00 00 01 ]
You can apply this patch in the Dolphin emulator by going to the “Patches” tab of the game’s properties and entering it like so:
Setting this value to 1 caused an interesting looking graph to appear at the bottom of the screen:

It looked like a performance meter, with the little bars at the bottom of the screen growing and shrinking. (Later on when I looked up the names of the functions that draw the graph, I found that they do in fact display metrics for CPU and memory usage.) This was neat, but not particularly useful. Setting the value above 1 actually stopped my town from loading up, so it didn’t seem like there was much else to do with this.
Zuru mode
I started to look around at other references to debug-related things, and saw something
called “zuru mode” pop up a few times. Branches to code blocks that had debug functionality
often checked a variable called zurumode_flag.
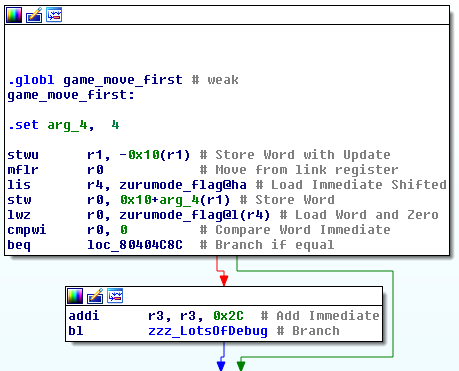
In the game_move_first function pictured above, zzz_LotsOfDebug (a name I made up)
only gets called if zurumode_flag is non-zero.
Looking for functions related to this value yields the following:
zurumode_initzurumode_callbackzurumode_updatezurumode_cleanup
At first glance they’re all a bit obscure, twiddling around
various bits at offsets in a variable called osAppNMIBuffer.
Here’s a first look at what these functions do:
zurumode_init
- Set
zurumode_flagto 0 - Check some bits in
osAppNMIBuffer - Store a pointer to the
zurumode_callbackfunction in thepadmgrstructure - Call
zurumode_update
zurumode_update
- Check some bits in
osAppNMIBuffer - Conditionally update
zurumode_flagbased on these bits - Print out a format string to the OS console.
This kind of thing is usually useful for giving context to the code, but there were a bunch of unprintable characters in the string. The only recognizable text was “zurumode_flag” and “%d”.

Guessing it might be Japanese text using a multi-byte character encoding, I ran the string through a character encoding detection tool and found out it was Shift-JIS encoded. The translated string just means “zurumode_flag has been changed from %d to %d”. That doesn’t provide much new information, but knowing about the use of Shift-JIS does, as there are many more strings in the binaries and string tables that use this encoding.
zurumode_callback
- Calls
zerumode_check_keycheck - Check some bits in
osAppNMIBuffer - Prints value of
zurumode_flagsomewhere - Calls
zurumode_update
zerumode_check_keycheck didn’t show up before because of the different
spelling.. what is it?
A huge complex function that does lots more bit twiddling on values without names. At this point I decided to back off and look for other debug-related functions and variables, as I wasn’t even sure what the significance of zuru mode was. I also wasn’t sure what “key check” meant here. Could it be a cryptographic key?
Back to debug
Around this time I noticed that there was an issue with the way I loaded the debug symbols
into IDA. The foresta.map file on the game disc contains a bunch of addresses and names
for functions and variables. I hadn’t noticed initially that the addresses for each section
started over at zero, so I just set up a simple script to add a name entry for each line
in the file.
I set up new some IDA scripts to fix up the symbol map loading for the different sections of the program:
.text, .rodata, .data, and .bss. The .text section is where all the functions are,
so I set the script to automatically detect functions at each address when setting a name this time.
For the data sections, I set it to create a segment for each binary object (such as m_debug.o,
which would be compiled code for something called m_debug), and set up space and names for each piece of data.
This gives me much more information than I had before, although I now had to manually define the data
type for each piece of data, as I set each data object to be a simple byte array. (In hindsight it would
have been better to at least assume any data with a size that’s a multiple of 4 bytes contained 32-bit
integers, as there are so many of them, and many contain addresses to functions and data that are important
for building up cross-references.)
While looking through the new .bss segment for m_debug_mode.o, I saw some variables like quest_draw_status and
event_status. These are interesting because I want to get debug mode to display some more useful stuff than
the performance graph. Luckily, there were cross-references from these data entries to a huge piece of code
that checks debug_print_flg.
Using the Dolphin debugger, I set a breakpoint on the function where debug_print_flg gets checked
(at 8039816C) to see how the check works. The breakpoint never hit.
Let’s check why: this function is called by game_debug_draw_last. Guess what value is checked before conditionally
calling it? zurumode_flag. What the heck is it?
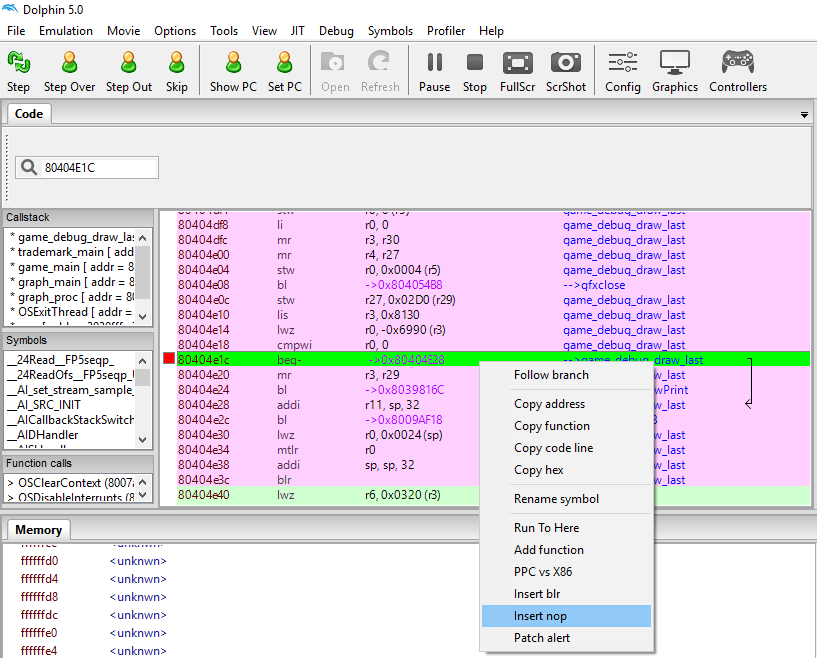
I set a breakpoint on that check (80404E18) and it broke immediately. The value of zurumode_flag was zero, so it
would normally skip calling this function. I NOPped out the branch instruction (replaced it with an instruction that
does nothing) to see what would happen when the function does get called.
In the Dolphin debugger you can do this by pausing the game, right-clicking on an instruction, and then clicking “Insert nop”:
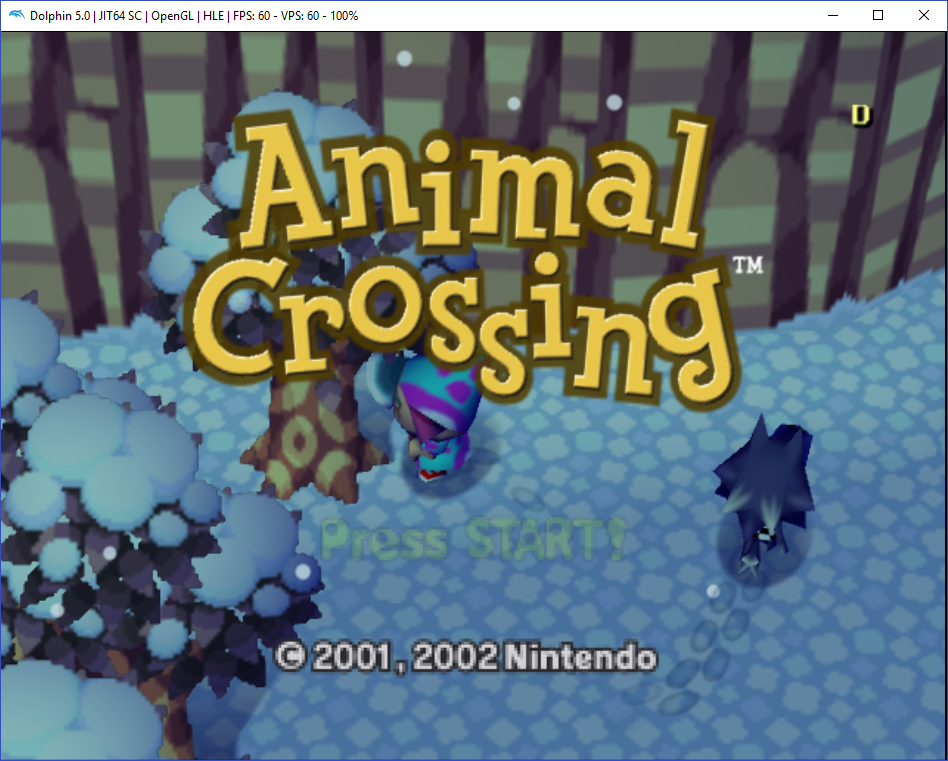
Nothing happened. Then I checked what has happening inside the function, and found another branch statement that could
short circuit past all of the interesting stuff at 803981a8. I NOPped that out as well, and the letter “D”
appeared at the top right corner of the screen.
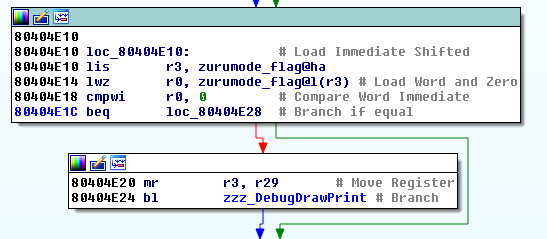
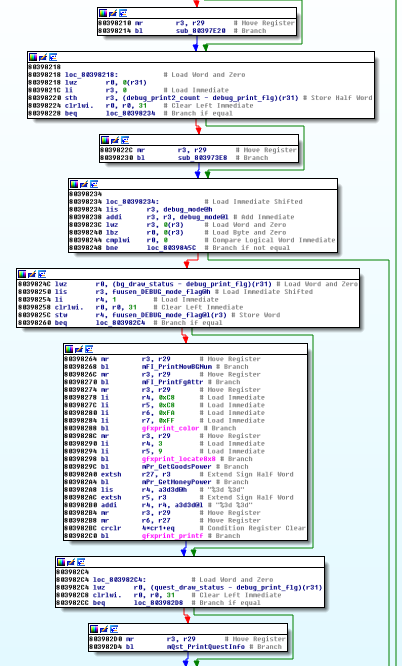
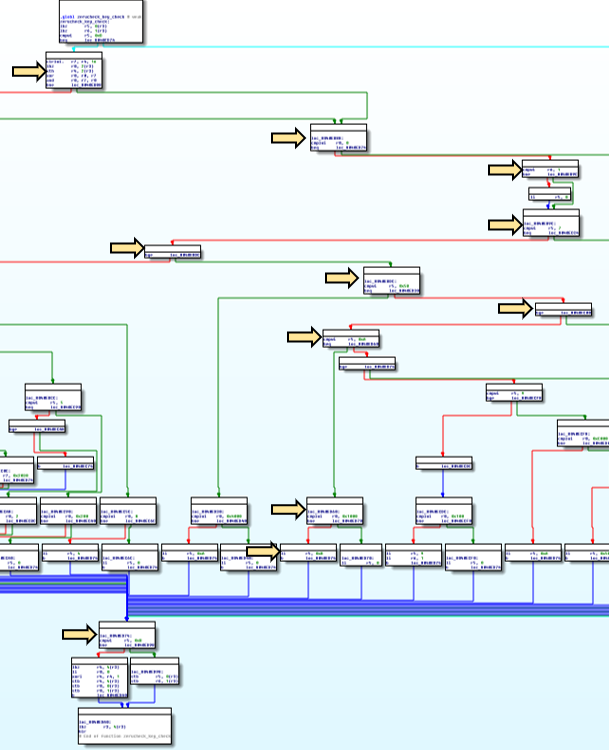
There was a bunch more interesting looking code in this function at 8039816C (I called it zzz_DebugDrawPrint),
but none of it was getting called. If you look at the graph view of this function, you can see that there’s a
series of branch statements that skip over blocks throughout the entire function:
By NOPping out more of these branch statements, I started to see different things get printed to the screen:
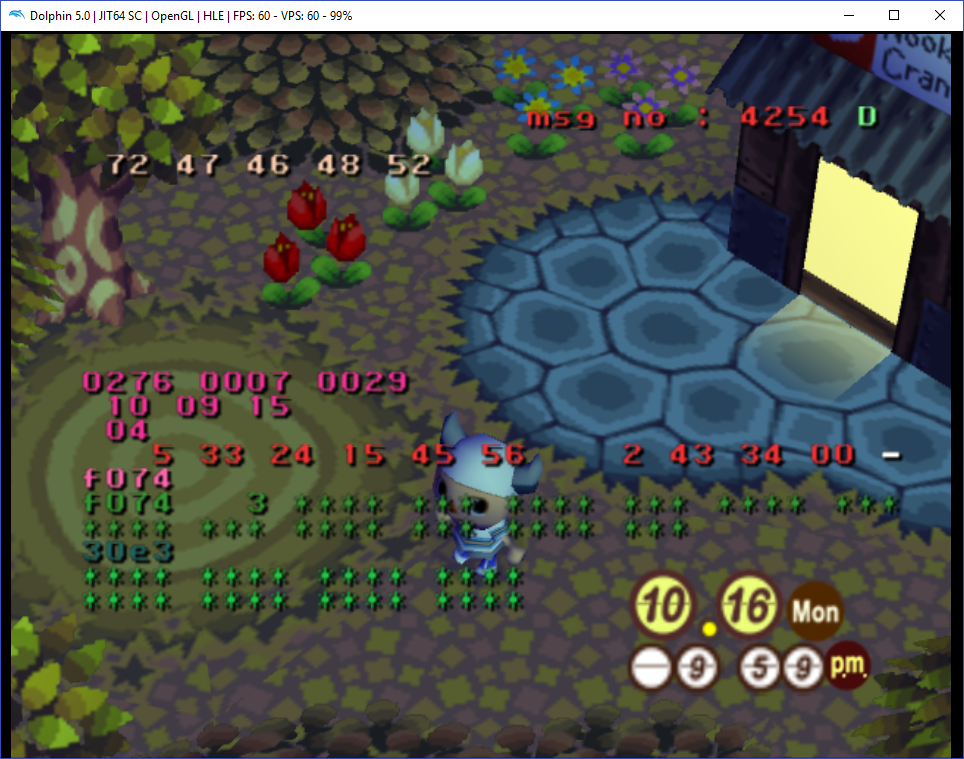
The next question is how to activate these debug features without modifying the code.
Also, zurumode_flag appears again for some branch statements made in this debug draw function.
I added another patch so that zurumode_flag is always set to 2 in zurumode_update, because it’s
usually compared specifically with 2 when it’s not being compared with 0.
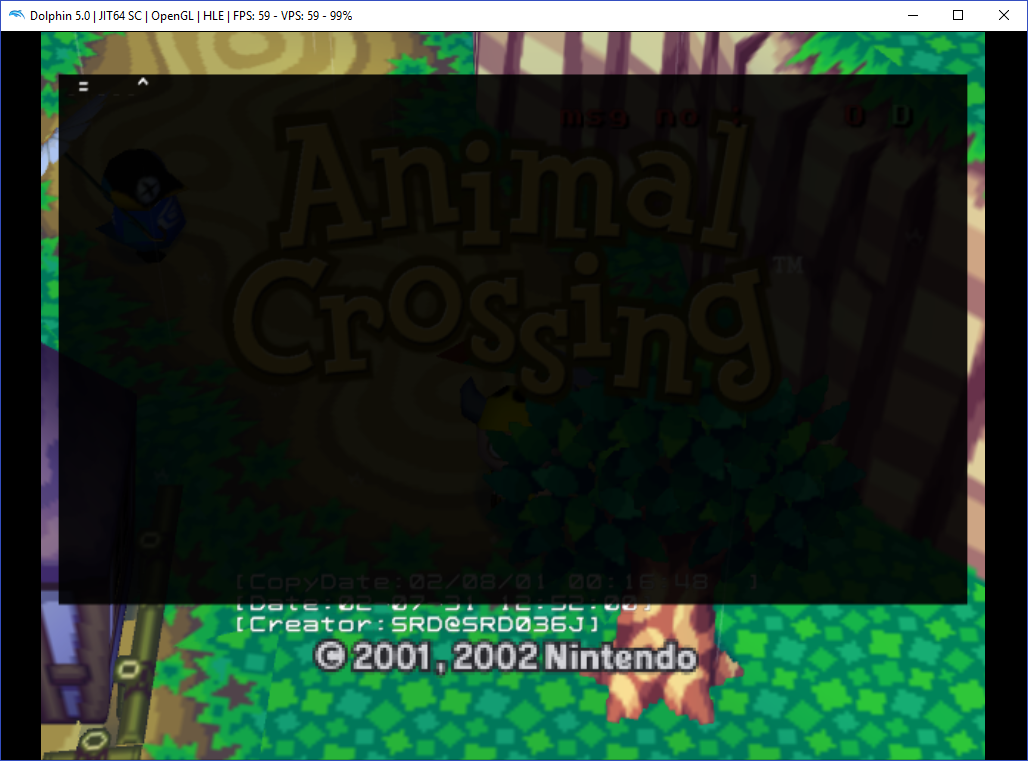
After restarting the game, I saw this “msg. no” message displayed at the top right of the screen.
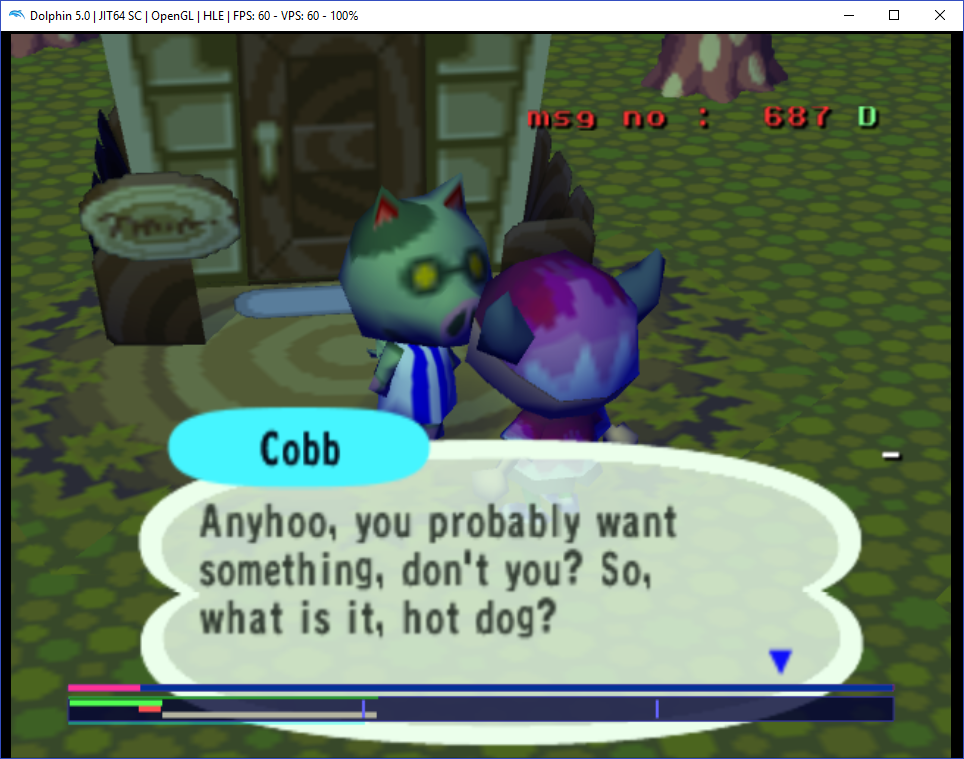
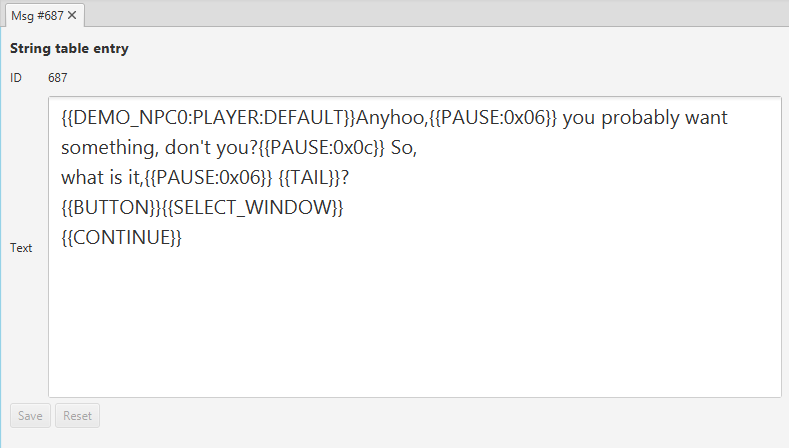
The number 687 is entry ID of the most recently displayed message. I checked this using a simple table viewer I made early on, but you can also check it with a full GUI string table editor I made for ROM hacking. Here’s what the message looks like in the editor:
At this point it was clear that figuring out zuru mode was no longer avoidable; it’s tied directly into the debugging features of the game.
Zuru mode revisited
Returning to zurumode_init, it initializes a few things:
0xC(padmgr_class)is set to the address ofzurumode_callback0x10(padmgr_class)is set to the address ofpadmgr_classitself0x4(zuruKeyCheck)is set to the last bit of a word loaded from0x3C(osAppNMIBuffer).
I looked into what padmgr means, and it’s short for “gamepad manager”. This suggests there could be
a special key (button) combination to enter on the gamepad to activate zuru mode, or possibly some
special debugging device or development console feature that could be used to send a signal to
activate it.
zurumode_init only runs the first time the game is loaded (pressing reset button doesn’t trigger it).
Setting a breakpoint at 8040efa4, where 0x4(zuruKeyCheck) is set, we can see that during boot
without holding down any keys, it’s going to be set to 0. Replacing this with 1 causes an interesting thing to happen:
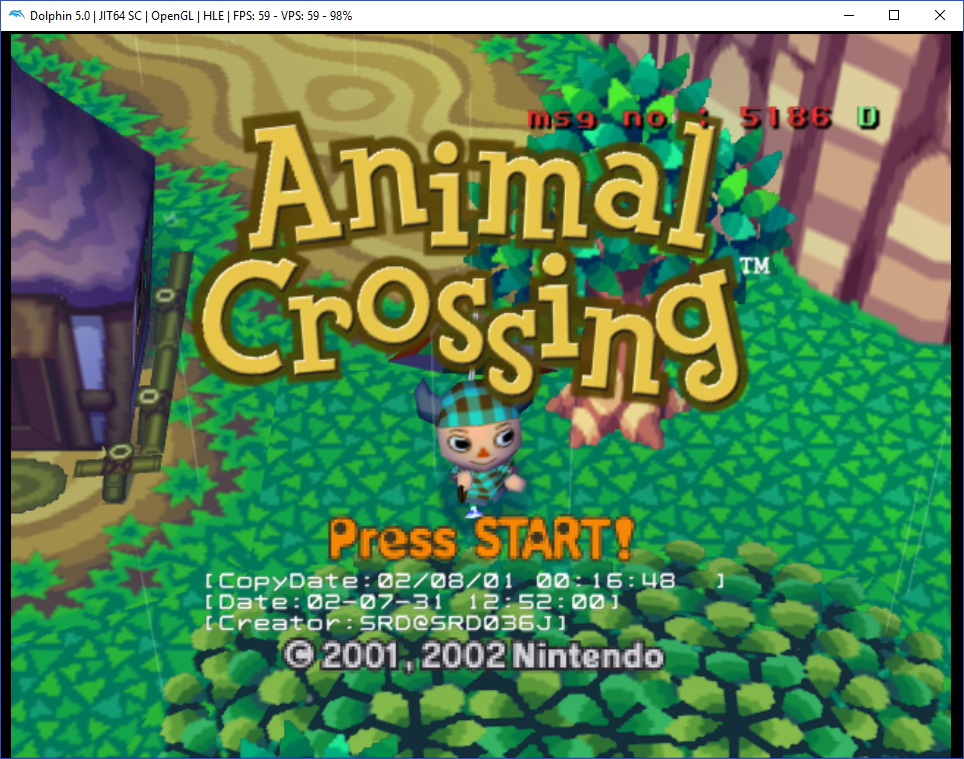
The letter “D” shows up in the upper right corner again (green instead of yellow this time), and there’s also some build info:
[CopyDate: 02/08/01 00:16:48 ]
[Date: 02-07-31 12:52:00]
[Creator:SRD@SRD036J]
A patch to have 0x4(zuruKeyCheck) always set to 1 on start:
8040ef9c 38c00001
This seems like it’s the correct way to get zuru mode initialized. After that, there may be different actions we need to take in order to get certain debug information to display. Starting up the game and walking around and talking to a villager didn’t show any of the displays mentioned previously (besides the letter “D” in the corner).
The likely suspects are zurumode_update and zurumode_callback.
zurumode_update
zurumode_update is first called by zurumode_init, and then repeatedly gets called by
zurumode_callback.
It checks the last bit of 0x3C(osAppNMIBuffer) again and then updates zurumode_flag
based on its value.
If the bit is zero, the flag is set to zero.
If not, the following instruction runs with r5 being the full value of 0x3c(osAppNMIBuffer):
extrwi r3, r5, 1, 28This extracts the 28th bit from r5 and saves it into r3.
Then 1 is added to the result, so the final result is always 1 or 2.
zurumode_flag is then compared to the previous result, depending on how many
of the 28th and last bits are set in 0x3c(osAppNMIBuffer): 0, 1, or 2.
This value is written to zurumode_flag. If it didn’t change anything, the
function ends and returns the current value of the flag. If it does change the value,
a much more complex chain of code blocks executes.
A message in Japanese is printed: this is the “zurumode_flag has been changed from %d to %d” message mentioned earlier.
Then a series of functions are called with different arguments depending on whether the flag was changed to zero or not. The assembly for this part is tedious, so the pseudo code of it looks like this:
if (flag_changed_to_zero) {
    JC_JUTAssertion_changeDevice(2)
    JC_JUTDbPrint_setVisible(JC_JUTDbPrint_getManager(), 0)
} else if (BIT(nmiBuffer, 25) || BIT(nmiBuffer, 31)) {
    JC_JUTAssertion_changeDevice(3)
    JC_JUTDbPrint_setVisible(JC_JUTDbPrint_getManager(), 1)
}
Notice that if the flag is zero, JC_JUTDbPrint_setVisible is given an argument of 0.
If the flag is not zero AND bit 25 or bit 31 are set in 0x3C(osAppNMIBuffer), the
setVisible function is passed an argument of 1.
This is the first key to activating zuru mode: the last bit of 0x3C(osAppNMIBuffer)
must be set to 1 in order to make the debug displays visible and set zurumode_flag
to a non-zero value.
zurumode_callback
zurumode_callback is at 8040ee74 and is probably called by a function related to
the gamepad. Setting a breakpoint on it in Dolphin debugger, the callstack
shows that it is indeed called from padmgr_HandleRetraceMsg.
One of the first things it does is run zerucheck_key_check. It’s complex, but overall it seems
to read and then update the value of zuruKeyCheck. I decided to see how that value is used in
the rest of the callback function before going any further into the keycheck function.
Next it check some bits in 0x3c(osAppNMIBuffer) again. If bit 26 is set, or else if bit 25 is
set and padmgr_isConnectedController(1) returns non-zero, the last bit in 0x3c(osAppNMIBuffer)
is set to 1!
If neither of those bits are set, or if bit 25 is at least set but padmgr_isConnectedController(1)
returns 0, then it checks if the byte at 0x4(zuruKeyCheck) is 0. If it is,
then it will zero out the last bit in the original value and write it back to 0x3c(osAppNMIBuffer).
If not, then it still sets the last bit to 1.
In pseudo-code this looks like:
x = osAppNMIBuffer[0x3c]

if (BIT(x, 26) || (BIT(x, 25) && isConnectedController(1)) || zuruKeyCheck[4] != 0) {
    osAppNMIBuffer[0x3c] = x | 1   // set last bit
} else {
    osAppNMIBuffer[0x3c] = x & ~1  // clear last bit
}
After that, if bit 26 is not set, it shorts to calling zurumode_update and then finishes.
If it is set, then if 0x4(zuruKeyCheck) is not zero, it loads up a format string where it
appears that it’s going to print out: “ZURU %d/%d”.
Recap
Here’s what happens:
padmgr_HandleRetraceMsg calls the zurumode_callback.
My guess is that “handle retrace message” means it has just scanned key presses
on the controller. Each time it scans, it may call a series of different callbacks.
When zurumode_callback runs, it checks the current key (button) presses.
This seems to check for a specific button or combination of buttons.
The last bit in the NMI Buffer is updated based on specific bits in its current
value, as well as the value of one of the zuruKeyCheck bytes (0x4(zuruKeyCheck)).
Then zurumode_update runs and checks that bit. If it’s 0, the zuru mode flag will be
set to 0. If it’s 1, the mode flag is updated to 1 or 2 based on whether bit 28 is set.
The three ways to activate zuru mode are:
- Bit 26 is set in
0x3C(osAppNMIBuffer) - Bit 25 is set in
0x3C(osAppNMIBuffer), and a controller is connected to port 2 0x4(zuruKeyCheck)is not zero
osAppNMIBuffer
Wondering what osAppNMIBuffer was, I started by searching for “NMI”, and found references
to “non-maskable interrupt” in the context of Nintendo. It turns out that the entire variable
name also shows up in the developer documentation for the Nintendo 64:
osAppNMIBuffer is a 64-byte buffer that is cleared on a cold reset. If the system reboots because of a NMI, this buffer is unchanged.
Basically, this is a small piece of memory that persists across soft reboots. A game can use this buffer to store whatever it wants as long as the console is powered on. The original Animal Crossing game was actually released on Nintendo 64, so it makes sense that something like this would show up in the code.
Switching over to the boot.dol binary (everything above is from foresta.rel),
there are a lot of references to osAppNMIBuffer in the main function. A quick look shows
that there are series of checks that can result in various bits of 0x3c(osAppNMIBuffer)
getting set with OR operations.
Interesting OR operand values to look out for would be:
- Bit 31: 0x01
- Bit 30: 0x02
- Bit 29: 0x04
- Bit 28: 0x08
- Bit 27: 0x10
- Bit 26: 0x20
Remember that bits 25, 26, and 28 are especially interesting: 25 and 26 determine whether zuru mode is enabled, and bit 28 determines the level of the flag (1 or 2). Bit 31 is also interesting, but primarily seems to be updated based on the values of the others.
Bit 26
First up: at 800062e0 there’s an ori r0, r0, 0x20 instruction on the buffer value
at 0x3c. This would set bit 26, which always results in zuru mode being enabled.
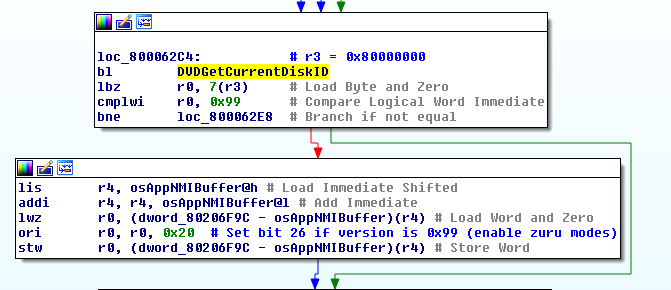
For the bit to be set, the 8th byte returned from DVDGetCurrentDiskID has to be 0x99.
This ID is located at the very beginning of the game disc image, and is loaded up at
80000000 in memory. For a regular retail release of the game, the ID looks like this:
47 41 46 45 30 31 00 00 GAFE01..
Patching the last byte of the ID to 0x99 causes the following to happen when starting up
the game:
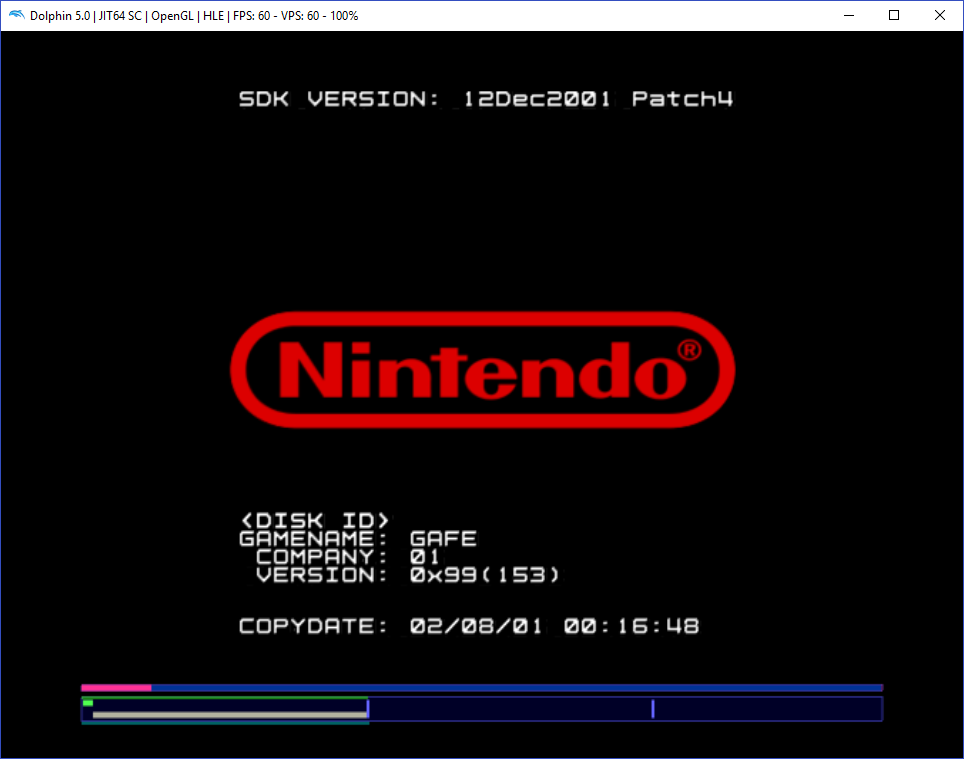
And in the OS console, the following is printed:
06:43:404 HW\EXI_DeviceIPL.cpp:339 N[OSREPORT]: ZURUMODE2 ENABLE
08:00:288 HW\EXI_DeviceIPL.cpp:339 N[OSREPORT]: osAppNMIBuffer[15]=0x00000078
All of the other patches can be removed, and the letter D also appears in the top right corner of the screen again, but none of the other debug displays are activated.
Bit 25
Bit 25 is used in conjunction with performing the port 2 controller check. What causes it to be enabled?
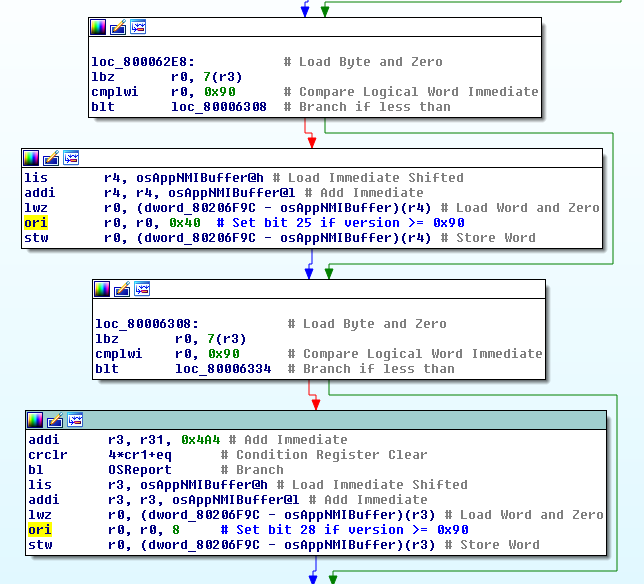
This turns out to have the same check used for bit 28: the version must be
greater than or equal to 0x90. It bit 26 was set (ID is 0x99), both of these
bits will also be set, and zuru mode will be enabled anyway.
If the version is between 0x90 and 0x98, though, zuru mode is not immediately enabled.
Recalling the check made in zurumode_callback, it will only be enabled if bit 25 is set
and padmgr_isConnectedController(1) returns non-zero.
Once a controller is plugged into port 2 (the argument to isConnectedController is zero-indexed),
zuru mode gets activated. The letter D and the build info display on the title screen, and…
pressing buttons on the second controller controls the debug displays!
Some buttons also do things beside changing the display, such as increasing the speed of the game.
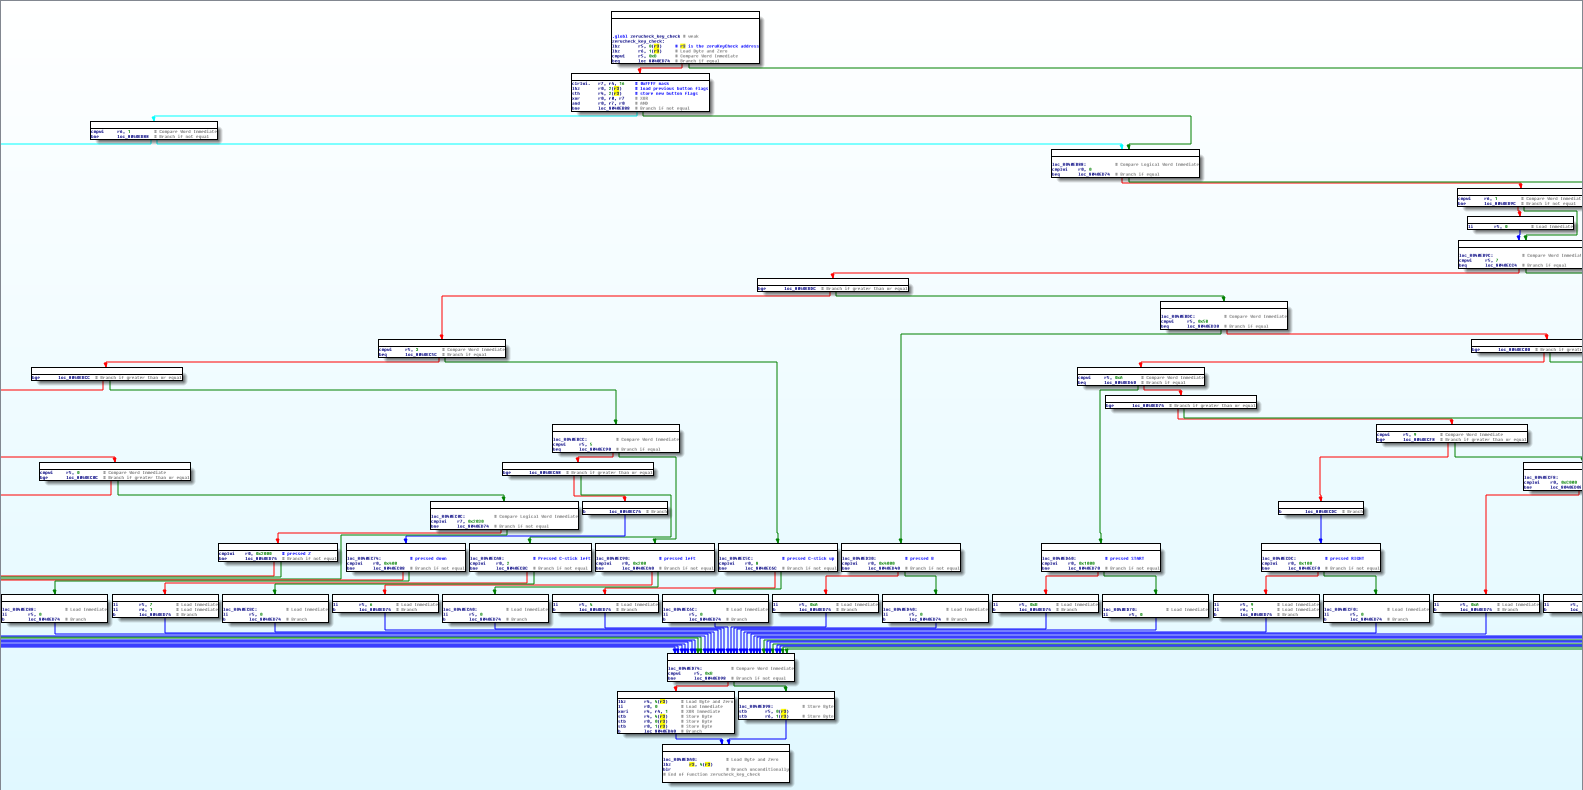
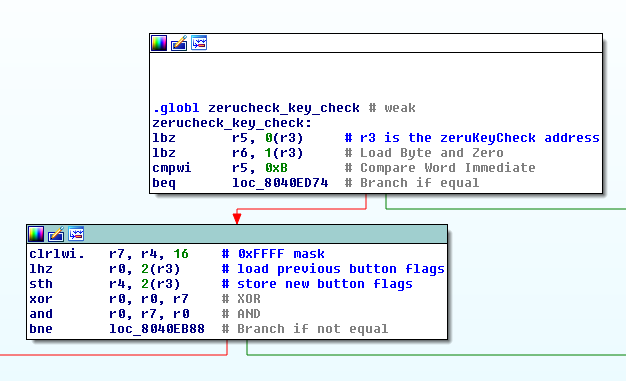
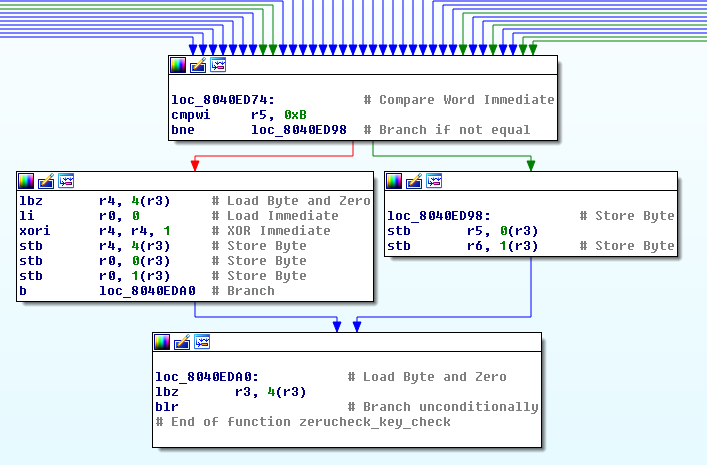
zerucheck_key_check
The last mystery is 0x4(zuruKeyCheck). It turns out that this value gets updated by
the giant complex function shown before:
Using the Dolphin debugger, I was able to determine that the value checked by this function is a set
of bits corresponding to button presses on the second controller. The button press trace is
stored in a 16-bit value at 0x2(zuruKeyCheck). When there’s no controller plugged in,
the value is 0x7638.
The 2 bytes containing flags for the controller 2 button presses are loaded and then
updated near the beginning of zerucheck_key_check. The new value is passed in with
register r4 by padmgr_HandleRetraceMsg when it calls the callback function.
Down near the end of zerucheck_key_check, there’s actually another place where 0x4(zuruKeyCheck)
is updated. It didn’t appear in the list of cross-references because it’s using r3 as the base
address, and we can only figure out what r3 is by looking at what it’s set to any time
this function is about to be called.
At 8040ed88 the value of r4 is written to 0x4(zuruKeyCheck). It’s loaded from the
same location and then XORd with 1 just before that. What this should do is toggle the value
of the byte (really just the last bit) between 0 and 1. (If it’s 0, the result of
XORing it with 1 will be 1. If it’s 1, the result will be 0. Look up the truth table
for XOR to see this.)
I didn’t notice this behavior while watching the memory values before, but I’ll try
breaking on this instruction in the debugger to see what’s happening. The original value is
loaded at 8040ed7c.
Without touching any buttons on the controllers, I don’t hit this breakpoint during
the title screen. To reach this code block, the value of r5 must be 0xb before the
branch instruction that comes before it (8040ed74). Of the many different paths that lead
up to that block, there’s one that will set r5 to 0xb before it, at 8040ed68.
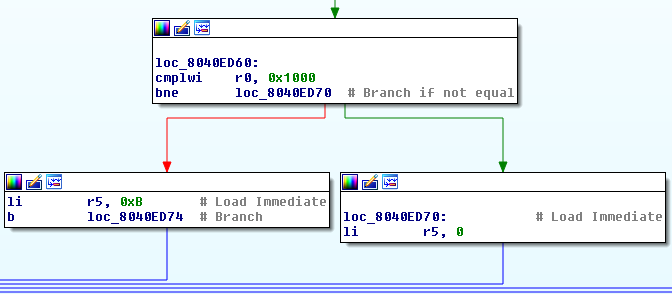
Note that in order to reach the block that sets r5 to 0xB, r0 must have been
equal to 0x1000 just before. Following the blocks up the chain to the beginning
of the function, we can see the constraints necessary to reach this block:
- 8040ed74:
r5must be0xB - 8040ed60:
r0must be0x1000 - 8040ebe8:
r5must be0xA - 8040ebe4:
r5must be less than0x5B - 8040eba4:
r5must be greater than0x7 - 8040eb94:
r6must be 1 - 8040eb5c:
r0must not be 0 - 8040eb74: Port 2 button values must have changed
Here we reach the point where the old button values are loaded and the new values are stored. Afterwards there are a couple of operations applied to the new and old values:
old_vals = old_vals XOR new_vals
old_vals = old_vals AND new_vals
The XOR operation will mark all of the bits that have changed between the two
values. The AND operation then masks the new input to unset any bits that are
not currently set. The result in r0 is the set of new bits (button presses) in the
new value. If it’s not empty, we’re on the right path.
For r0 to be 0x1000, the 4th out of the 16 button trace bits must have just changed.
By setting a breakpoint after the XOR/AND operation I can figure out which
button press causes this: it’s the START button.
The next question is how to get r5 to start out as 0xA. r5 and r6 are loaded from
0x0(zuruKeyCheck) at the beginning of the key check function, and updated near the end when we don’t
hit the code block that toggles 0x4(zuruKeyCheck).
There are a few places just before where r5 gets set to 0xA:
8040ed508040ed008040ed38
8040ed38
8040ed34:r0must be0x4000(B button was pressed)8040ebe0:r5must be0x5b8040eba4:r5must be greater than0x7- same as before from here on…
r5 must start at 0x5b
8040ed00
8040ecfc:r0must be0xC000(A and B pressed)8040ebf8:r5must be >= 98040ebf0:r5must be less than 108040ebe4:r5must be less than0x5b8040eba4:r5must be greater than0x7- same as before from here on…
r5 must start at 9
8040ed50
8040ed4c:r0must be0x8000(A was pressed)8040ec04:r5must be less than0x5d8040ebe4:r5must be greater than0x5b8040eba4:r5must be greater than0x7- same as before from here on…
r5 must start at 0x5c
It seems there’s some kind of state between button presses, and then a certain sequence of button combos need to be entered, ending with START. It seems like A and/or B come just before START.
Following the code path that sets r5 to 9, a pattern emerges: r5 is an incrementing
value that can either be increased when the correct button press value is found in r0,
or reset to 0. The weirder cases where it’s not a value between 0x0 and 0xB occur
when handling multi-button steps, such as pressing A and B at the same time. A person
trying to input this combo usually isn’t going to press both buttons at the exact
same time the pad trace occurs, so it has to handle either button being pressed
before the other.
Continuing with the different code paths:
r5is set to 9 when RIGHT is pressed at8040ece8.r5is set to 8 when C-stick right is pressed at8040eccc.r5is set to 7 when C-stick left is pressed at8040ecb0.r5is set to 6 when LEFT is pressed at8040ec98.r5is set to 5 (and r6 to 1) when DOWN is pressed at8040ec7c.r5is set to 4 when C-stick up is pressed at8040ec64.r5is set to 3 when C-stick down is pressed at8040ec48.r5is set to 2 when UP is pressed at8040ec30.r5is set to 1 (andr6to 1) when Z is pressed at8040ec1c.
The current sequence is:
Z, UP, C-DOWN, C-UP, DOWN, LEFT, C-LEFT, C-RIGHT, RIGHT, A+B, START
One more condition is checked before the Z check: while the newly pressed button
must be Z, the current flags must be 0x2030: the left and right bumpers must also
be pressed (they have values of 0x10 and 0x20). Also, the UP/DOWN/LEFT/RIGHT are the
D-pad buttons, not analog stick.
The cheat code
The full combo is:
- Hold L+R bumpers and press Z
- D-UP
- C-DOWN
- C-UP
- D-DOWN
- D-LEFT
- C-LEFT
- C-RIGHT
- D-RIGHT
- A+B
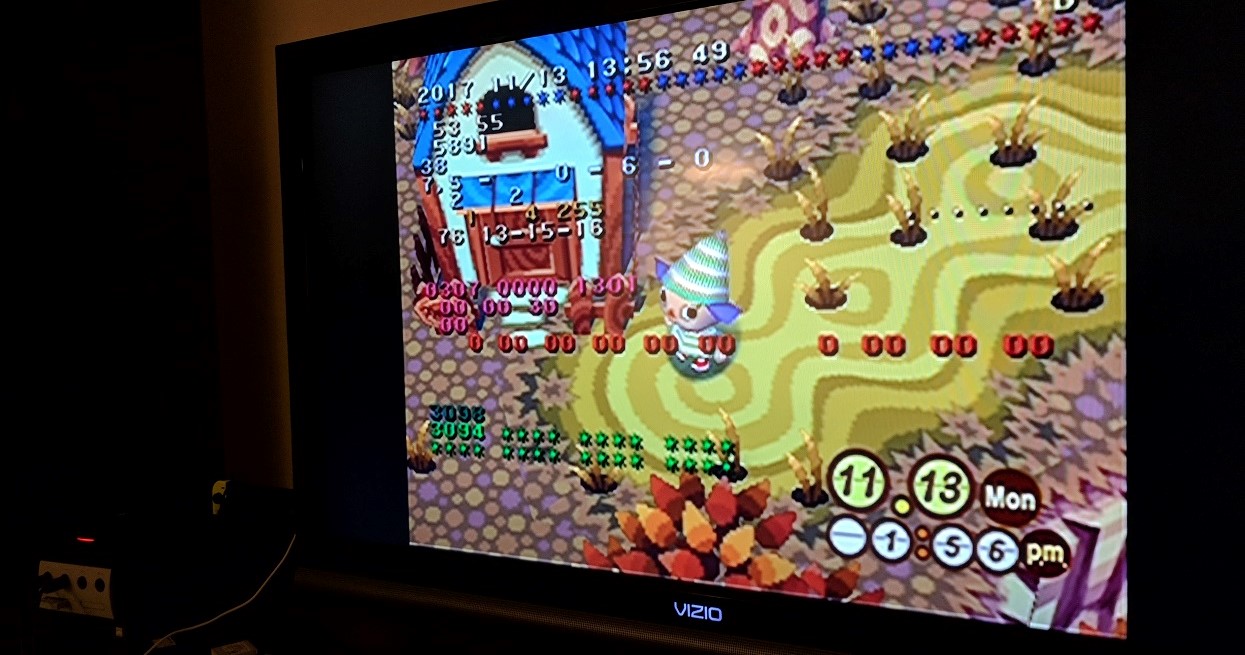
- START
It works! Attach a controller to the second port and enter the code, and the debug displays will show up. After that you can start pressing buttons on the second (or even third) controller to start doing things.
This combo will work without patching the version number of the game. You can even use this on a regular retail copy of the game without any cheat tools or console mods. Entering the combo a second time turns the zuru mode back off.
The “ZURU %d/%d” message in zurumode_callback is used to print out the status of this combination if you enter it
when the disk ID is already 0x99 (presumably for debugging the cheat code itself). The first number
is your current position in the sequence, matching r5. The second is set to 1 while certain buttons
in the sequence are held down, these might correspond to when r6 is set to 1.
Most of the displays don’t explain what they are on the screen, so to figure out what they’re doing you have to find the functions that handle them. For example, the long line of blue and red asterisks that appear at the top of the screen are placeholders for displaying the status of different quests. When a quest is active some numbers will appear there, indicating the state of the quest.
The black screen that shows up when you press Z is
a console for printing debug messages, but specifically for low level stuff such as memory allocation
and heap errors or other bad exceptions. The behavior of fault_callback_scroll suggests it may be for
displaying those errors before the system is rebooted. I didn’t trigger any of these errors,
but I was able to cause it to print a couple of garbage characters with some NOPs. I think this would be
really useful for printing custom debug messages later on:
After doing all this, I found out that getting debug mode by patching the version ID
to 0x99 is already known: https://tcrf.net/Animal_Crossing#Debug_Mode. (They also have some good
notes on what the various displays are, and more things you can do using a controller in port 3.)
As far as I can tell, the cheat combination has not been published yet, though.
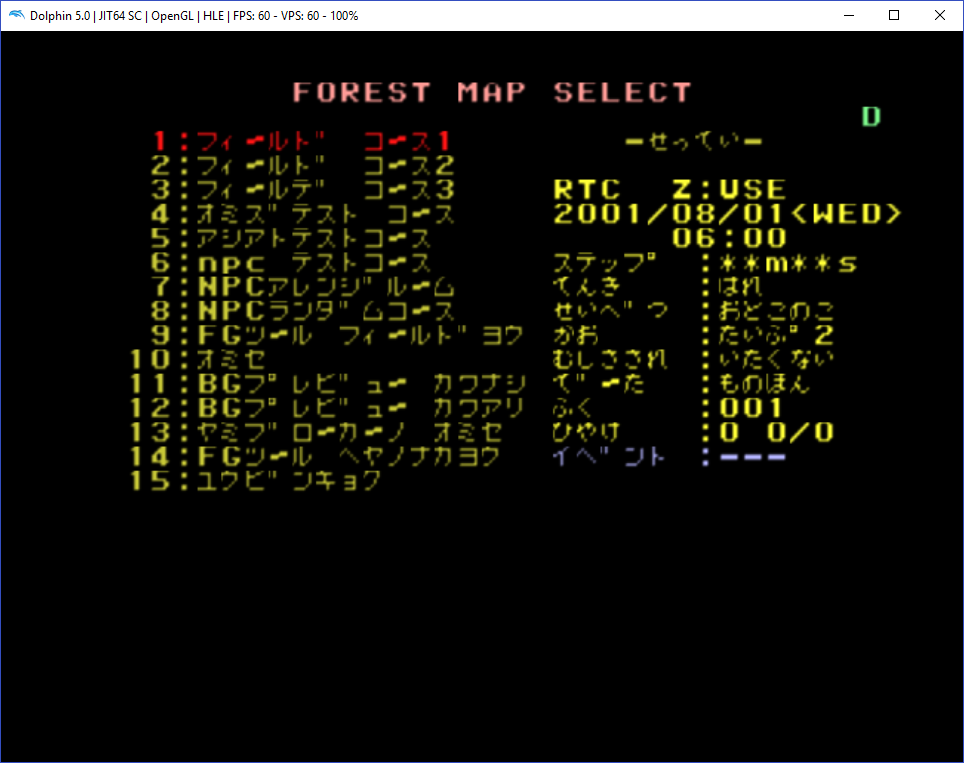
That’s all for this post. There are still some more developer features that I’d like to explore, such as the debug map screen and NES emulator select screen, and how to activate them without using patches.
I’ll also be posting write ups about reversing the dialog, event, and quest systems for the purpose of making mods.
Update: The slides for the talk I did on this can be found here.